How to Convert and Fit 2-3 avi Movies IN 1 DVD
Yet and again i have come back with an intresting topic.As the title suggest we are going to fit 2-3 movies in a dvd.The software required is D.I.K.O.It can be downloaded at http://www.vmesquita.com/en/index.htm.
The most amazing part is that the software is FREE.
CONFIGURATION:
The first time we start D.I.K.O., we will need to very the configuration.
Note: screen shots are based on the 1.47 Gold version. Screens for the free version are similar.
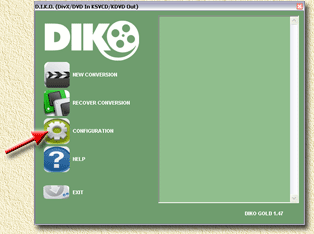
Now click the "CONFIGURATION" button. The following screen will appear:
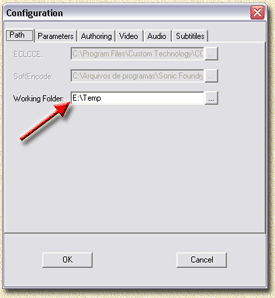
In the first screen (tab called "Path") we set our working directory. Make sure this points to a directory where you have a couple of Gbytes free. I always make sure I have about 8 Gb free in that folder.
Now go to the next tab (called "Parameters"). Copy the settings as shown in the image below:
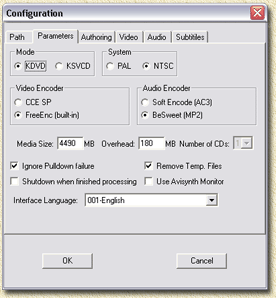
Details:
MODE
Select if you want to make a DVD (KDVD) or a Super VCD (KSVCD).
SYSTEM
Select your TV System here. PAL is commonly used in Europe, NTSC in the USA.More details can be found on the Video Formats page (look at the bottom).Note from Riez: mixing PAL and NTSC movies might cause issues!
VIDEO ENCODER
Select FreeEnc to begin with (I'm pretty pleased with it).If you want to use CCE, then after selecting this, go back to the "Path" tab and set the "ECLCCE" path to you CCE directory.
AUDIO ENCODERI
use BeSweet since Soft Encode seems to be a commercial application (it is discontinued however).
MEDIA SIZEI
have set mine to 4490 Mb with 180 Mb overhead. Slightly more than the default. Either will work just fine.However, when using DVD-R (since this media type does not support overbunring) you're stuck with the maximum (default) value of 4482 Mb.
OTHER SETTINGSI
have checked "Ignore Pulldown failure" and "remove Temp files".Optionally, if you do the encoding during the night, you can check "Shutdown when finished processing".The option "Use AviSynth Monitor" can be practical - if you're an expert - to monitor problems (never had a use for it).Also note that there have been reports that AviSynth Monitor may actually cause problems! Naturally you can set the interface language to your language, however in this guide we stick with English.
Now we go to the next tab: "Authoring".
We have 2 options here:
1) We author our DVD ourselves using DVDLab, TMPGEnc DVD Author or another DVD authoring tool.
In this window uncheck everything, including the "Author Disc" option.Authoring your DVD's yourself gives you more freedom in designing my own layout, chapters, and functionality you would like.But it will also take more time ...
2) We have D.I.K.O. Auhtor our DVD
If you want to use this option (definitly less work), then make sure "Author Disc" is checked.This option will create a directory called "author" holding two folders: "AUDIO_TS" and "VIDEO_TS" with the complete DVD in it.
The other settings are the default languages you wish to use for Audio (Sound Language) and subtitles (Subs language).
The chapter option is default set to 5 minutes. Which means that D.I.K.O. will generate a chapter every 5 minutes.You can change this value to 5, 10, 15, 20 minutes, or "Don't add chapters". Personally I would recommend keeping it a 5 minutes.You can check "Create DVD Image" (if you use Nero then this is not required), which will create an ISO file which most burning software can burn. I usually have Nero handle this problem, so I leave it unchecked.You can also check the option "Burn using DVD Decrypter". This will burn the DVD right away once D.I.K.O. finished creating the image. Again: I prefer to have Nero do the burning. So I leave it unchecked. Leaving this unchecked also offers you the option to do a quality check before burning your conversion to a DVD.
The next tab "Video" is used for setting encoder specific settings, here we assume that we use FreeEnc:
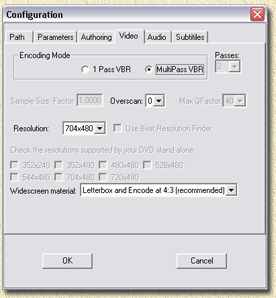
For best quality:compression ratio I always select "Multipass VBR". For top speed conversion select "1 Pass VBR".
The option overscan should be set to zero.
"Resolution" depends on your TV system: PAL uses 704x576, NTSC uses 704x480. For some movies it might make sense to use a lower resolution. However so far I have not had any movie where the default value didn't work properly. See also the the Video Formats page.
The next tab is "Audio". The default settings are just fine.Default 2.0 audio (stereo) is set to 160 kbps. If you selected "Soft Encode" on "Parameters" tab, then 5.1 audio is set to 384 kbps
converting movies:
So now we're back at the start window. Click the "New Conversion" button:
![]() A new window opens allowing you to select the AVI files you wish to convert:
A new window opens allowing you to select the AVI files you wish to convert:
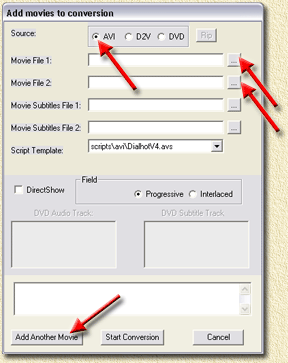 In this window we select our AVI files, D2V files (DVD2AVI project files), or a regular DVD (might not work very well with the free version).In this guide we will not dig into the advanced D2V project files or DVDs, and stick with AVI files only!
Note: The DVD option is not available in the free version!
I found that on average you can store between 4 and 7 hours of movie on a DVD with still a good quality.So that is about 2 to 4 movies, or about 11 episodes of your favorite show (right click an AVI, and select properties. This will show you the playback time of each individual AVI).
Adding a movie
Note: If you use the DVD Auhtoring feature; make sure you add the movies in the same order as you have set the buttons in the JPG image!
Click the "..." button next o the field "Movie File 1:".
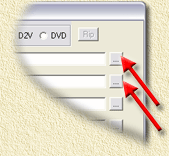 A file dialog will open allowing to select your AVI file.
If your movie is split in two parts (not uncommon, for example CD1 and CD2), the use the "Movie File 2:" to select the second part.Note that this should be the second part of THE SAME MOVIE!
Note: Optionally you can drag the AVI file into the "Movie File 1:" or "Movie File 2:" field.
Adding the next movie
If you want to add another movie, then click "Add Another Movie" and repeat the steps as described for adding a movie/avi.Only use this button if this is NOT your last movie!!!
Once you have added all your AVI's you can click the button "Start Conversion". then click ok.thats it coversion will start then.U will be able to play in standalone.
(via weethet)
0 Comments:
Post a Comment